Introduction
From time to time you may run into cases where you need to restrict where a Device or User is permitted to make calls to. Recently we had a use case were a calls needed to be restricted on a IP Phone to only extensions, and disable the Device’s ability to make calls to the outside world.
So understanding the types of restrictions and how they effect Users and Devices differently is important.
The first thing you should understand, is that Restriction Rules with in the Avalo Voice Platform are Inherit. This means the Restrictions are Inherited from the Level above, in order, Meaning, The Restrictions placed in the Account level, will be Inherited by the User Level, and Then are Inherited down to the Device Level. The most detailed level control of course is at the Device level since it’s at the bottom of the Inherit order.
In most cases however you will want to set Restrictions at the Account Level which will have the most broad effect.
Restriction Types
The Avalo Voice Platform is designed with Several Restriction Types, so it is also important to understand how they effect the ability to make outbound calls:
-
US TollFree
If you Deny Access to this Calling Type, Calls can not be placed outbound to any NADP (North American Dial Plan) Toll Free Area Codes, i.e.: 800, 888, 877, 866, 855, 844. This is the least commonly used Restriction Type.
-
US Toll
This will Deny Outbound Calling to any US/NADP (Including Canada) Telephone number that is not “on-net” and terminates out to the PSTN.
-
Emergency Dispatcher
This will Deny Calls to Emergency Services Such as 112, or 911.
-
Caribbean
Enabling this Restriction Type will disable outbound calling to Countries which us the NADP numbering plan, but are considered international destinations. This is a very commonly used Restriction Type since most of these Calling Destinations are very expensive.
-
US DID
This Restriction type is a little miss leading, but it would Deny calling to any “on-net” DID. It wouldn’t matter it it was International or otherwise.
-
International
This Type deny’s calling to any destination you have to dial 011 to reach.
-
Unknown
This is basically Extension to Extension Dialing.
So now that we understand the different types, we should review a few use cases.
Device Level Restrictions
At the lowest level, you can set Device Level Restrictions. These will override any restriction settings set at the User Level, unless the restriction is already set to Deny. We have outlined two use cases here for you to see:
Restricting All Calls
The Account Admin would like to Restrict all calling on a Device since it will be used as a common area phone. They don’t want to be able to make any Outbound calling expect for extension to other Extensions.
In this case, The Account Admin would Enter into the Device Edit Screen by going to VoIP Service/Hosted PBX >> Advanced >> Devices

From here you can select the device you want to edit from the list of devices found in the left part of the screen:

Once you have accessed the Device Edit Screen, Make sure you are in the Advanced View:

Along the top you should see a tab for Restrictions, When you click on it, you should see the different Restriction Types noted at the beginning of this article. To Restrict calling to extensions only, you would change all of the Restriction type from Inherit to Deny for all expect Unknown:
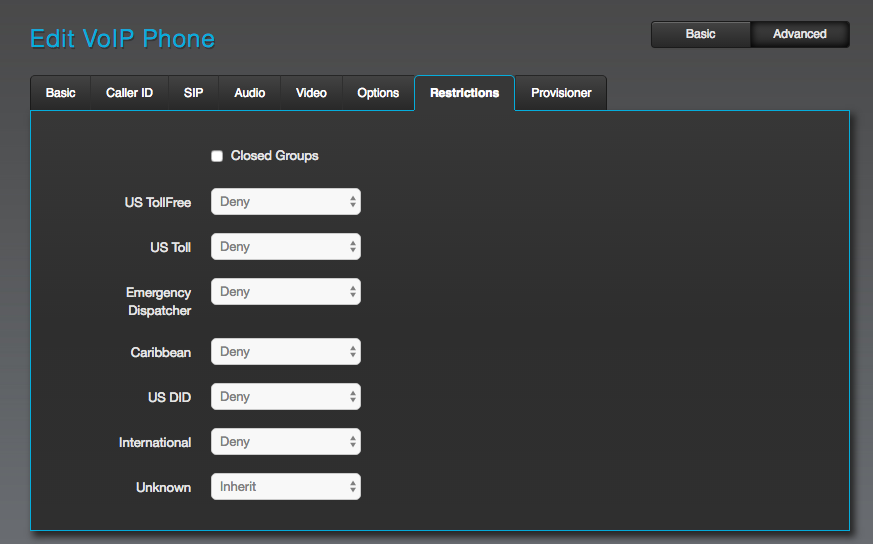
Then of course click save.
US Destinations Only
If the even you want to only allow US Calling, including Toll Free, US “off-net” and “on-net” destinations, you would follow all the same steps as listed in the first use case, but adjust the Call Restrictions as such, Deny everything expect for US TollFree, US Toll, US DID and Unknown, for Extension to Extension Dialing.
In this use case we also allowed for Emergency Dispatcher, since it’s important that users be able to call 911 or other emergency services number.
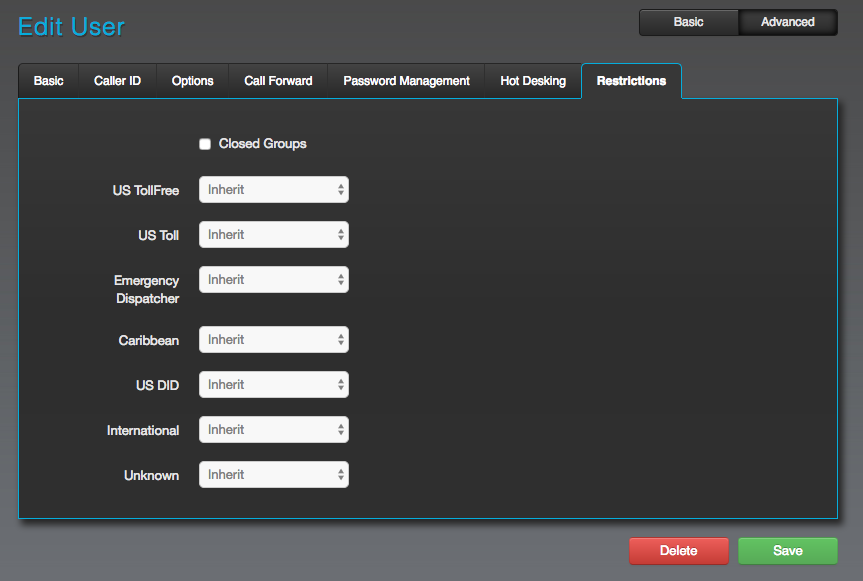
User Level Restrictions
Setting up User Level Restrictions is done in much the same manner. Any devices that are assigned to the user will inherit the users restriction settings. To access the user’s restrictions you will need to access the User’s List by going to VoIP Service/Hosted PBX >> Advanced >> Users in the AMP portal.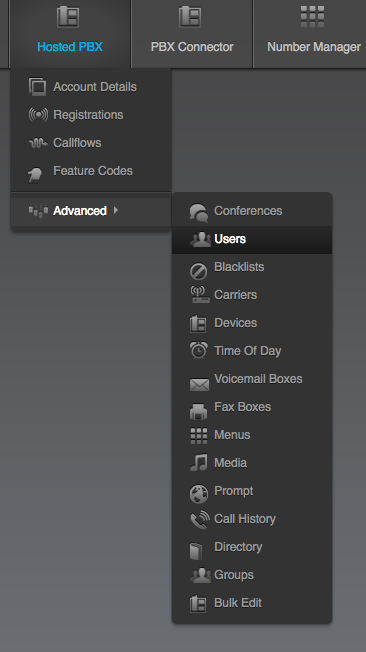
After accessing the Users List, select the user you would like to set the Calling Restrictions for.
Once you have done that, you should have the Edit User screen, make should you are looking at the Advanced View, but Selecting Advanced in the upper right hand corner of the Edit Screen. This will display additional tabs include the Restrictions tab.

At this point, you can now set calling restrictions on the user but click on the Restrictions tab, and using the same use cases shown above.